

Installing Ubuntu
Before You Begin the Installation
Installing a new operating system is a major event, and you should make sure that you have properly thought through what is going to take place. The first thing to consider is how the hardware will be affected by the software that you propose to install. Although Ubuntu will run well on an extremely wide variety of hardware, it is worthwhile checking your hardware components out because there may be a banana skin waiting for you to slip up on.
You start by researching and documenting your hardware. This information will prove helpful later on during the installation.
Research Your Hardware Specifications
At the absolute minimum, you should know the basics of your system, such as how much RAM you have installed, what type of mouse, keyboard, and (importantly) monitor you have. Knowing the storage capacity of your hard drive is also important because it will help you plan how you will divide it up for Ubuntu. It is also a good idea to find out whether you are using SATA drivers or the more traditional PATA drives. A small detail such as whether your mouse uses the USB or PS/2 interface will ensure proper pointer configuration—something that should happen without fail, but you will be glad you knew in case something goes wrong! The more information you have, the better prepared you will be for any problems.
Items you need to know include the amount of installed memory, size of your hard drive, type of mouse, capabilities of the display monitor (such as maximum resolution), and number of installed network interfaces (if any).
Installation Options
Ubuntu is available in three forms: the Ubuntu distribution, the Ubuntu server distribution, and the Ubuntu alternative distribution. For most people, the main distribution should suffice; the alternative is mainly used for upgrading existing Ubuntu users to the latest version, as well as allowing installation on low-powered systems. As for the server installation, this gives you access to a LAMP server in about 20 minutes (Linux, Apache, MySQL, and PHP), but as you will learn in this book, all these components are available to the Ubuntu default distribution.
Planning Partition Strategies
Partitioning is a topic that can strike fear into the hearts of novice Linux users. Coming from a Microsoft world, where you might just be used to having one hard drive, it can seem a bit strange to use an operating system that makes partitioning important. Depending on your requirements, you may opt to have a single large partition to contain all your files or you may prefer to segment your installation across several partitions to match your individual needs. You also need to take into account such things as what you will use to back up your data. With the abundance of external hard drives and Flash-based memory sticks, you could use these; remember, however, to provision backup storage space equal to or in excess of your specific requirements. Thanks to the ever-decreasing prices of storage, you can buy a 250GB SATA drive for just more than $100. You will thank yourself that you backed up your data when your primary hard drive goes down!
The needs of the business should be the primary concern when deciding to implement a Linux system. Be careful when specifying a system and ensure that you build in an adequate upgrade path that allows you to extend the life of the system and add any additional storage or memory.
Knowing how software is allocated on your hard drive for Linux involves knowing how Ubuntu organizes its file system, or layout of directories on storage media. This knowledge will help you make the most out of hard drive space; and in some instances, such as planning to have user directories mounted via NFS or other means, can help head off data loss, increase security, and accommodate future needs. Create a great system, and you'll be the hero of information services.
To plan the best partitioning scheme, research and know the answers to these questions:
How much disk space does your system require?
Do you expect your disk space needs to grow significantly in the future?
Will the system boot just Ubuntu, or do you need a dual-boot system?
How much data will require backup, and what backup system will work best? (See Chapter 17, "Backing Up, Restoring, and Recovery," for more information on backing up your system.)
CD-ROM Installation Jump-Start
To install Ubuntu from the disc , you must have at least a Pentium-class CPU, 3GB of hard drive space, and 256MB RAM. Most modern systems have significantly larger drives, and it is an idea to invest in more storage from your local computer store.
To begin the installation, you need to get into your computer's BIOS to set the boot sequence so that the CD/DVD drive is the first drive that is booted. Insert the DVD into the drive and let the system boot. When the menu appears, press the Enter key to boot into Ubuntu Live.
Double-click the Install icon on the desktop and follow the instructions. When the installer finishes, choose to restart the system immediately; eventually, the disc ejects, and Ubuntu starts to boot. After a few seconds, the login window appears. Enter the username and password specified during the installation. Welcome to Ubuntu!
The Boot Loader
During installation, Ubuntu automatically installs GRUB (Grand Unified Boot Loader) to the Master Boot Record (MBR) of your hard drive. Handily enough, it also detects any other operating systems such as Windows and adds entries in GRUB as appropriate. If you have a specific requirement not to install GRUB to the MBR, you need to install using the Alternate disc, which will allow you to specify the install location for GRUB.
Installing from CD or DVD
Most PCs' BIOS support booting directly from a CD or DVD drive, and enable you to set a specific order of devices (such as floppy, hard drive, CD-ROM, or USB) to search for bootable software. Turn on your PC and set its BIOS if required (usually accessed by pressing a Function or Del key after powering on); then insert your Ubuntu disc and boot to install Ubuntu.
To use this installation method, your computer must support booting from your optical drive. You can verify this by checking your BIOS and then booting your PC.
Older PCs might prove problematic when you desire to boot to an install using optical media. The good news is that this should no longer be a problem with most post-1995 personal computers.
Starting the Install
To get started, insert the DVD into your drive and reboot your computer. You will first see a boot screen that offers a variety of options for booting (see Figure 3.1).
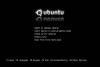
Figure 3.1 Select an installation option in this first Ubuntu boot screen.
After the bootup, Ubuntu's GNOME-based desktop appears ready for you to start experimenting (see Figure 3.2). At this point, you have a fully functional Ubuntu desktop in place with the exception that nothing has been installed to your hard drive. Live CDs are somewhat unique to Linux and are a great way to test out a disro's compatibility with your hardware. Take this opportunity to have a play around with Ubuntu to see whether any problems exist.
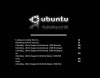
Figure 3.2 You can check your CD-ROM or DVD media before installing Ubuntu.
More often than not, your hardware will be fine, and you can proceed to install Ubuntu. You do this by double-clicking the Install icon helpfully located on your desktop (see Figure 3.3).

Figure 3.3 The standard Ubuntu desktop, complete with the helpful Install icon ready for you to make the switch to Ubuntu.
After a couple of seconds, the Installation Welcome screen appears and prompts you to select a language (see Figure 3.4). As you can see, Ubuntu supports a wide range of languages, even native Welsh! Click forward when you have selected your language.
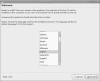
Figure 3.4 Select a language to use when installing Ubuntu.
The next screen asks you to specify your location in the world. This is used for setting time and region options, so find the city closest to you on the map and select it. Figure 3.5 shows that we have selected London, but it could be another city that is closer to you. Ubuntu automatically chooses the time zone and detects the offset from Greenwich mean time (GMT) for you. If you want to specify time settings, click the Set Time button, which gives you Time & Date Settings (see Figure 3.6).
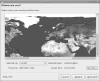
Figure 3.5 Choose the closest city to you in the world to allow Ubuntu to configure time and region settings correctly.
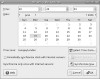
Figure 3.6 Set your clocks accurately, or let the Internet do it for you.
You cannot set Ubuntu to update its time setting automatically until you have finished the installation, but you can do a one-off synchronize, and it is worth doing this to ensure accuracy. Click Forward to continue to the next screen.
Following on from the Time and Region screen is the keyboard layout. Ubuntu will give a good guess at what type of keyboard is connected to your computer, but it allows you to change it in case it should differ. Make sure to find the correct layout for your keyboard (see Figure 3.7). If in doubt, use the text box at the bottom of the screen to try out all the keys.
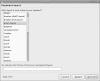
Figure 3.7 Choose the most appropriate keyboard layout for your computer, and then rigorously test it!
When you are happy that the keyboard layout is correct, click Forward to move on to the personal details screen (see Figure 3.8). Here you need to input your full name, your required username and password, and the name of the computer that you are installing onto.
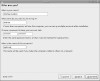
Figure 3.8 Fill out all the fields on this screen to give you and your computer an identity.
CAUTION
When you set your password, be sure and remember what you entered! If you forget it, you will not be able to do much with your new system because you will not be able to log on to it.
When setting a password, make sure that it has a mixture of letters and numbers to make it more secure. For instance, a good example of a password is T1a5c0p. Although this may seem like garbage at first glance, the easy way to remember it is by remembering the phrase This Is A Good Choice Of Password, shortened to Tiagcop, and finally substituting some of the letters with similar-looking numbers. Experiment with some phrases to see what you can come up with.
Click Forward to move on to partitioning.
Partitioning under Linux used to be somewhat of a black art, but Ubuntu has made it easy. You have three main options (shown in Figure 3.9): resize the disk and use the freedup space, erase and use the entire disc, or manually edit the partition table. Unless you have a requirement to do so, avoid the third option; it can seriously cause trouble with other operating systems. For now, we assume that you want to resize your partition.
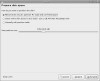
Figure 3.9 Tread carefully. One false move could obliterate your Windows partition. Wait, you wanted to do that?
Use the slider to choose how big you want your new partition to be. We recommend no less than 20GB, to give yourself plenty of breathing room on your hard drive. Click Forward to start the resizing process. This can take some time, so you may want to go off and read some more of this book to learn about what else you can do with Ubuntu.
Alternatively you might decide that you want to erase all the data on your disk and start from scratch. In our opinion, this is the easiest and fastest option. Regardless of whether you go for resizing or erasing all, you end up at the Ready to Install screen, where Ubuntu summarizes the information that you have given it so you can check it off. The final step is to click Install. After you do so, Ubuntu begins copying files across to your hard drive (see Figure 3.10).
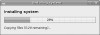
Figure 3.10 Sit back as Ubuntu takes over and installs itself to your hard drive.
After about 10 minutes, the installation finishes and you are asked whether you want to remain in the Live CD or reboot into your new system (see Figure 3.11). Click Restart Now for Ubuntu to eject the disc and reboot back into the full desktop system.
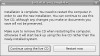
Figure 3.11 All done. Now all you have to do is reboot and watch as your system appears.
At this point, get ready to connect your machine to the Internet. Log in to Ubuntu at the GDM welcome page (see Figure 3.12) and you will arrive at the default Ubuntu desktop (see Figure 3.13).
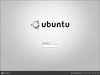
Figure 3.12 Enter your username and password to log on to your new system.

Figure 3.13 All ready for you to jump right in, the Ubuntu desktop welcomes you!
TIP
Ubuntu works well with other operating systems, and you should see your other operating system listed on the GRUB screen. If you do not, head on over to http://www.tldp.org to get a host of tips for configuring GRUB.
First Update
The first thing that you need to do with your new system is update it to the latest package versions. You do this mainly to ensure that you have the latest security updates available.
You can do this in a couple of ways in Ubuntu, but the easiest way to do it is to click the Updates icon in the panel to open the Update Manager. Your screen will darken, and you will be asked for a password. This password is the same as the one you used to log in to your system and is used in this case to authorize Ubuntu to make a systemwide change (install software, on this occasion).
Figure 3.14 shows the Update Manager in action.
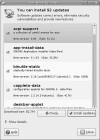
Figure 3.14 Get the latest security and bug-fix updates for your installed software by using Update Manager.
The application is easy to use because it automatically retrieves information on all the possible updates available to you. Just click Install Updates to start downloading and installing the necessary package updates, as shown in Figure 3.15.
Figure 3.15 Update Manager takes the hard work out of keeping your software current.
If you want more information, just click the Show Details arrow, or if you want Ubuntu to check again, click the Check button to force Ubuntu to refresh the updates.
Shutting Down
At some point, you are going to want to shut your computer down. As with most things in Linux, there are different ways to do it. You can use the Quit icon located in the upper-right corner of your screen or use the same button located in the System menu. Either way, you can choose to shut down or restart your system. You can also choose to hibernate (saves a copy of the running state to disk and shutdowns) or suspend (saves the current running state to memory). We would recommend using either shutdown or reboot to ensure you get a clean system when it comes back up.
If you are working at the command line, you can immediately shut down your system by using the shutdown command like this:
$ sudo shutdown -h now
You can also use the shutdown command to restart your computer, as follows:
$ sudo shutdown -r now
For new users, installing Ubuntu is just the beginning of a new and highly rewarding journey on the path to learning Linux. For Ubuntu system administrators, the task ahead is to fine-tune the installation and to customize the server or user environment.

)
)
)
)
)
)
)
)
)
)
)
)
)
)
)
No hay comentarios:
Publicar un comentario